About Me

My photo
Sewing and cooking are two of my favorite things. In the past, I often found myself searching for pictures and details of projects I have done, without success. So I decided to start documenting my creations. Then my son suggested I add my recipes to the blog so that they are documented also.

Saturday, May 19, 2012

Too Many Eggs - Make a Frittata

I had way too many eggs that needed used this week so I made a frittata for lunch.  I gathered vegetables that I had in the fridge, some cheese and 10 eggs.  Any vegetables work as does any kind of shredded cheese to equal about 1 cup.  So here's what I used.

Carrots, broccoli, onions - all chopped but since I was sauteing all together I chopped the carrots smaller so they would be tender in the same time as the larger pieces of broccoli and onion.


So I had shredded cheddar cheese and I shredded a small block of pepper jack cheese to make 1 cup of combined cheese.  I knew my hubby would like some meat so I chopped up some Virginia baked ham to mix in also.  I had a small amount of chopped turkey bacon from last weekend so I figured I would throw it in also.

I used an 11 inch skillet that can be placed in the oven for the last minutes of baking.


I sauteed the vegetables in 2 tablespoons of olive oil till tender, about 4 minutes.  Then I stirred in the ham and cooked for a few minutes more.  Lastly I added the bacon bits and 3/4 cup of the cheese.  I stirred all together and then used my immersion blender to mix the 10 eggs.

I really like the immersion blender as I can use it in hot mixtures as well as cold. It is the perfect instrument to blend lumps out of your gravy.  You just have to remember to keep it on the bottom of the pan or pot when it is in motion.              
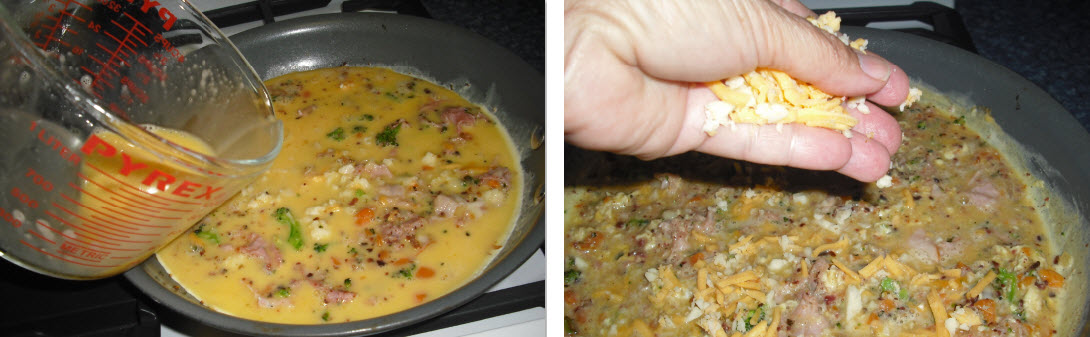
So when my ingredients were tender and all heated through, I poured in the eggs.  Then I sprinkled the remaining 1/4 cup of shredded cheese on top.  I also added a few twists of ground pepper over it all.  I usually add some salt but did not this time because I used ham and bacon and there would be enough salt.


I kept the pan over medium heat for a few minutes until the eggs were getting dry around the edge of pan.  Then I pop in a 375 degree oven for 15 minutes until bubbly and lightly browned.  The frittata is a perfect meal with some fruit or a small salad.  It can also be eaten cold later in the day.

Sunday, May 13, 2012

Embroidered Gifts


I was asked to monogram a canvas tote bag as a birthday gift.  It is for an 80th birthday so I figured the recipient would like a classic font.  I used a font from Embroitique the Fancy Monogram 1. 


I also wanted to give some kitchen towels as small gifts at dinner on Mother's Day, so I made a design using The Fancy Monogram 1 for a 4 inch initial and then for the full name used the Embird Alphabet #23.  I used a small coffee cup symbol that I had downloaded from somewhere in the past.  I will use this combination again because I really like it.


Cheese Pop Appetizers

Happy Mother's Day to all!!  I was invited to my son's for dinner but I thought I would take an appetizer.  I had seen this on Pinterest so I modified the recipe a little and made them up.  My cheese balls are made of a combination of parmigiano-reggiano, 6 ounces of cream cheese and 6 ounces of havarti cheese.  Roll into small balls, insert lollipop stick and place in freezer to firm up for about 10 minutes.  Then roll in a mixture of chopped spinach, chopped thyme, 6 slices chopped bacon and 2 ounces of chopped pecans.  They were scrumptious and quite a hit.

Thursday, May 10, 2012

Make Your Own Decorator Pillows

I always forget how easy it is to make decorator pillows until I get a request to do so.  Pillows are inexpensive and can drastically change the look of a room.  I usually make the envelope style just because it is easy to launder when necessary, but when I am short on fabric I will do panels and just sew the opening closed.

My daughter-in-law wanted to put bright pillows on her outdoor furniture so we bought outdoor canvas that resists mold and mildew.  I sometimes use it for indoor pillows because it holds its shape so well. 

First of all you need the pillow form so that you can determine how much fabric to buy.  For a 16 X 16 you will need 1/2 yard of fabric that is at least 40 inch wide.  The front piece will be cut 17 inches by 17 inches, essentially adding 1/2 inch to each side to allow for the 1/2 inch seam.  To make the overlapping back you will cut 2 rectangles 17 X 12.  So for any size pillow form, the front panel will be the width plus 1 inch and length plus 1 inch.  The back panels will be 3/4 of width and length plus 1 inch. If the fabric is lightweight, the back panel can be interfaced.


On the back panels, one of the long edges of each need to be finished as they will form the envelope. I use my Janome Coverpro because it will hem and overcast at the same time. I press under 1 inch on the length and then stitch on the front and the back is overcast.
Other options for finishing the back edge are serging the edge and then pressing under 1 inch. Also the edge could be turned under 1/4 inch and then pressed under 3/4 inch and sewn with a straight stitch.


Now you are ready to sew your pillow together.  First lay down your front panel, right side up.
Next place 1 back panel wrong side up onto the front panel matching all three unfinished edges.
The next back panel is placed wrong side up, matching the opposite 3 unfinished edges.
Pin securely.


Sew completely around the square backstitching at beginning and end.  When you get to the section where the back sections overlap, backstitch over the 1 inch section to strengthen this area.  Stop sewing 1/2 inch from end of side and pivot fabric to sew the next side.

Before you turn right side out, cut across the point at each corner to reduce bulk and allow for a nice point when turned.


Now turn right side out, use a dowel to push out the corner and press before inserting the pillow.


Sunday, May 6, 2012

DIY iPad Case

Well my daughter got a new iPad and wanted a customized case.  She went to Joann Fabrics and chose a light violet swirly print cotton for the outside and a soft yellow flannel for the lining.  I looked online for a free pattern and used a combination of 2 patterns to get the look she wanted. The 2 sites for the patterns are Tablet Coverlet  by Pat Bravo and the Kindle Case by 100 Billion Stars; I used the measurements from the directions from 100 Billion Stars and the strip of lining on the outside and squared flap from the Tablet Coverlet.  She wanted a button and elastic loop for the closure also.


Instead of using fleece and interfacing, I chose to use 1 layer of Soft and Stable because it provides cushion and support without adding bulk.  I would definitely recommend using it for purses, totes and cases for electronic devices. This case only took about an hour to make but the funny part was that I could not figure out how to slip the lining inside the outside; it was like a puzzle to me but I figured it out finally!

Thursday, May 3, 2012

Baby Shower Gifts

Here are my latest creations; gifts for a baby shower.


I embroidered these designs on onesies for the fall holidays- baby due in July so I figured the 3-6 months size would be good for the fall.  I got the designs from  Planet Applique; all their designs stitch out so well.  I personally like the Halloween one best!


I made this bunting from the Simplicity pattern #2165.  This is the first time I made this bunting but it will now be a staple for a baby gift.  The instructions were easy to follow and it came out perfect the first time and is truly just too adorable.  If you used a solid fabric for the outside you could personalize with some embroidery also.  It only takes 7/8 of a yard each for the inside and outside fabrics.  I used flannel for both since it will be used for the summer and fall.  If you were making for a winter baby you could use fleece or minky for it.
I also made this personalized blanket for the new baby and pacifier bib and baby wipes case.


The blanket is made of fleece with the top embroidered portion made of flannel with another applique that I think I had downloaded from SewForum but I cannot find the exact source.  The back is made of the same flannel that I used for the top of the front and also for the inside of the bunting.  I found the pattern for the bib that has a tab to hold a pacifier on the Internet as a freebie; it was made by Nicole Scott but I do not have the link any longer. The embroidered lion on the bib is fromSewforum by Robin. I actually made the bib and case from receiving blankets that were on the baby gift registry.The case for the baby wipes was a free pattern from simplicity.com Baby Wipes Case.  I hate making binding but it did not turn out too badly, although I need a no fail way to sew binding on.